Скриншот в Selenium Webdriver используется для анализа ошибок. Selenium может автоматически делать скриншоты во время выполнения тестов. Но если пользователь хочет сделать снимок экрана самостоятельно, ему нужно использовать метод TakeScreenshot, который сообщает WebDriver о необходимости сделать скриншот и сохранить его в Selenium.

Подпишитесь на наш ТЕЛЕГРАМ КАНАЛ ПО АВТОМАТИЗАЦИИ ТЕСТИРОВАНИЯ
Содержание:
- Как сделать скриншот в Selenium
- Что такое Ashot API?
- Как загрузить и настроить Ashot API?
- Создание скриншота всей страницы с помощью AShot API
- Создание скриншота определённого элемента страницы
- Сравнение изображений с помощью AShot
- Краткие итоги
Как сделать скриншот в Selenium
Ниже приведён пошаговый процесс создания скриншота в Selenium WebDriver.
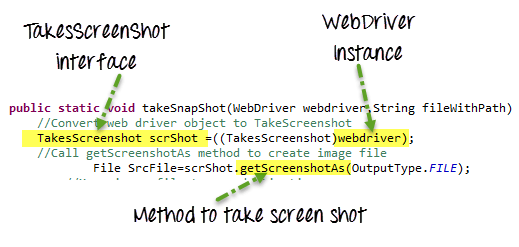
Шаг 1. Преобразуйте объект веб-драйвера в TakeScreenshot:
TakesScreenshot scrShot =((TakesScreenshot)webdriver);
Шаг 2. Вызовите метод getScreenshotAs для создания файла изображения:
File SrcFile=scrShot.getScreenshotAs(OutputType.FILE);
Шаг 3. Скопируйте файл в необходимое место.
В этом примере мы сделаем скриншот страницы https://demo.guru99.com/V4/ & и сохраним его в C:/Test.png.
Ниже приведён код для создания скриншота в Selenium:
package Guru99TakeScreenshot;

import java.io.File;

import org.apache.commons.io.FileUtils;

import org.openqa.selenium.OutputType;

import org.openqa.selenium.TakesScreenshot;

import org.openqa.selenium.WebDriver;

import org.openqa.selenium.firefox.FirefoxDriver;

import org.testng.annotations.Test;

public class Guru99TakeScreenshot {

    @Test

    public void testGuru99TakeScreenShot() throws Exception{

		WebDriver driver ;
    	System.setProperty("webdriver.gecko.driver","C:\\geckodriver.exe");
    	driver = new FirefoxDriver();

        //goto url

        driver.get("https://demo.guru99.com/V4/");

        //Call take screenshot function

        this.takeSnapShot(driver, "c://test.png") ;

    }

    /**

     * This function will take screenshot

     * @param webdriver

     * @param fileWithPath

     * @throws Exception

     */

    public static void takeSnapShot(WebDriver webdriver,String fileWithPath) throws Exception{

        //Convert web driver object to TakeScreenshot

        TakesScreenshot scrShot =((TakesScreenshot)webdriver);

        //Call getScreenshotAs method to create image file

                File SrcFile=scrShot.getScreenshotAs(OutputType.FILE);

            //Move image file to new destination

                File DestFile=new File(fileWithPath);

                //Copy file at destination

                FileUtils.copyFile(SrcFile, DestFile);

    }

}
Примечание: Selenium версии 3.9.0 и выше не поддерживает Apache Commons IO JAR. Вы можете скачать его здесь и вызвать в своём проекте.
Что такое Ashot API?
Ashot — это сторонняя утилита от компании Яндекс для создания скриншотов, которую поддерживает Selenium WebDriver. Она делает скриншот как отдельного веб-элемента, так и снимок страницы полностью.
Как загрузить и настроить Ashot API?
Существует два способа настройки Ashot API:
- С использованием Maven.
- Вручную без использования каких-либо инструментов.
Для настройки с помощью Maven:
- Перейдите по ссылке https://mvnrepository.com/artifact/ru.yandex.qatools.ashot/ashot.
- Выберете последнюю на данный момент версию — это 1.5.4.
- Скопируйте код и добавьте его в файл pom.xml.

- Сохраните файл, и Maven добавит jar-файл в ваш путь сборки.
Для ручной настройки
- Перейдите по ссылке https://mvnrepository.com/artifact/ru.yandex.qatools.ashot/ashot.
- Выберете последнюю версию.
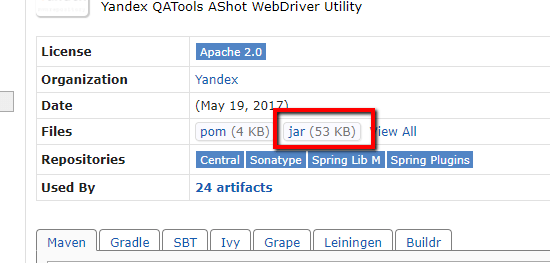
- Щёлкните на jar-файл и сохраните его на своём устройстве.

- Добавьте jar-файл в путь сборки.
- Далее в Eclipse щёлкните правой кнопкой мыши на проекте -> перейдите в свойства -> путь сборки (Build Path) -> библиотеки (Libraries) -> добавить внешние jar-файлы (Add External jars).
- Выберите jar-файл.
- Примените и закройте.
Создание скриншота всей страницы с помощью AShot API
Шаг 1. Создайте объект Ashot и вызовите метод takeScreenshot(), если вам нужен скриншот страницы, соответствующий размерам экрана устройства:
Screenshot screenshot = new Ashot().takeScreenshot(driver);
Если вам нужен скриншот страницы, превышающий размер экрана, то перед использованием метода takeScreenshot() вызовите метод shootingStrategy() для настройки. Затем вызовите метод takeScreenshot(), например:
Screenshot screenshot = new AShot().shootingStrategy(ShootingStrategies.viewportPasting(1000)).takeScreenshot(driver);
Шаг 2. Сохраните получившееся изображение в файл. Вы можете выбрать тип файла, например, jpg, png и т. д.
ImageIO.write(screenshot.getImage(), "jpg", new File(".\\screenshot\\fullimage.jpg"));
Создание полноэкранного скриншота страницы, превышающей размер экрана.
Пример: создание полноэкранного скриншота страницы https://demo.guru99.com/test/guru99home/ и сохранение его в файл screenshot.jpg.
Благодаря использованию класса ShootingStrategy из Ashot API, можно захватить полное изображение страницы, превышающее размер экрана.
Ниже приведён код для создания скриншота в Selenium:
package Guru99;

import java.io.File;
import java.io.IOException;
import javax.imageio.ImageIO;
import org.openqa.selenium.By;
import org.openqa.selenium.WebElement;
import org.openqa.selenium.WebDriver;
import org.openqa.selenium.chrome.ChromeDriver;
import ru.yandex.qatools.ashot.AShot;
import ru.yandex.qatools.ashot.Screenshot;
import ru.yandex.qatools.ashot.shooting.ShootingStrategies;

public class TestScreenshotUsingAshot {

public static void main(String[] args) throws IOException {

System.setProperty("webdriver.chrome.driver", "c:\\chromedriver.exe");
WebDriver driver  = new ChromeDriver();

driver.get("https://demo.guru99.com/test/guru99home/");
driver.manage().window().maximize();

Screenshot = new AShot().shootingStrategy(ShootingStrategies.viewportPasting(1000)).takeScreenshot(driver);

ImageIO.write(screenshot.getImage(), "jpg", new File("c:\\ElementScreenshot.jpg"));

	}

}
Создание скриншота определённого элемента страницы
Вот пример создания скриншота части логотипа Guru 99 на странице https://demo.guru99.com/test/guru99home/ и сохранения его в файл ElementScreenshot.jpg.
Ниже приведён код для создания скриншота в Selenium:
package Guru99;
import java.io.File;
import java.io.IOException;
import javax.imageio.ImageIO;
import org.openqa.selenium.By;
import org.openqa.selenium.WebElement;
import org.openqa.selenium.WebDriver;
import org.openqa.selenium.chrome.ChromeDriver;
import ru.yandex.qatools.ashot.AShot;
import ru.yandex.qatools.ashot.Screenshot;
import ru.yandex.qatools.ashot.shooting.ShootingStrategies;
public class TestElementScreenshotUsingAshot {
public static void main(String[] args) throws IOException {

System.setProperty("webdriver.chrome.driver", "c:\\chromedriver.exe");
WebDriver driver  = new ChromeDriver();

driver.get("https://demo.guru99.com/test/guru99home/");
driver.manage().window().maximize();

// Find the element to take a screenshot

WebElement element = driver.findElement(By.xpath ("//*[@id=\"site-name\"]/a[1]/img"));

// Along with driver pass element also in takeScreenshot() method.

Screenshot = new AShot().shootingStrategy(ShootingStrategies.viewportPasting(1000)).takeScreenshot(driver,element);

ImageIO.write(screenshot.getImage(), "jpg", new File("c:\\ElementScreenshot.jpg"));
	}
}
Сравнение изображений с помощью AShot
package Guru99;

import java.awt.image.BufferedImage;
import java.io.File;
import java.io.IOException;
import javax.imageio.ImageIO;
import org.openqa.selenium.By;
import org.openqa.selenium.WebDriver;
import org.openqa.selenium.WebElement;
import org.openqa.selenium.chrome.ChromeDriver;
import ru.yandex.qatools.ashot.AShot;
import ru.yandex.qatools.ashot.Screenshot;
import ru.yandex.qatools.ashot.comparison.ImageDiff;
import ru.yandex.qatools.ashot.comparison.ImageDiffer;

public class TestImageComaprison {

    public static void main(String[] args) throws IOException {

        System.setProperty("webdriver.chrome.driver", "C:\\chromedriver.exe");
        WebDriver driver = new ChromeDriver();
        driver.get("https://demo.guru99.com/test/guru99home/");

        // Find the element and take a screenshot

        WebElement logoElement = driver.findElement(By.xpath("//*[@id=\"site-name\"]/a[1]/img"));
        Screenshot logoElementScreenshot = new AShot().takeScreenshot(driver, logoElemnent);

        // read the image to compare

        BufferedImage expectedImage = ImageIO.read(new File("C:\\Guru99logo.png"));

        BufferedImage actualImage = logoElementScreenshot.getImage();

        // Create ImageDiffer object and call method makeDiff()

        ImageDiffer imgDiff = new ImageDiffer();
        ImageDiff diff = imgDiff.makeDiff(actualImage, expectedImage);

        if (diff.hasDiff() == true) {
            System.out.println("Images are same");

        } else {
            System.out.println("Images are different");
        }
        driver.quit();
    }
}
Краткие итоги
- Ashot API — бесплатный инструмент от компании Яндекс для создания скриншотов в Selenium.
- С его помощью можно сделать скриншот отдельного веб-элемента на различных платформах, таких как браузеры для ПК, iOS-симулятор мобильного браузера Safari, эмулятор браузера Android.
- Ashot API может делать снимки страниц, размер которых превышает размер экрана.
- Инструмент также позволяет выделять части скриншота и обеспечивает возможность сравнения снимков.
Перевод статьи «How to Take Screenshot in Selenium WebDriver».